It is time to focus attention on planter preparation for the new growing season. Achieving uniform emergence and seed spacing is critical to maximizing yield on an individual plant basis. Many of the sins that occur during planting can lead to severe repercussions later in the growing season. The margin of error can become small when poor weather and soil conditions occur during this timeframe. One thing for sure is that proper planter preparation can pay dividends come fall.
Use the dropdown menu below as a checklist for planter readiness. Taking the time to check even the menial items ensures a full-functioning planter performing at its best.
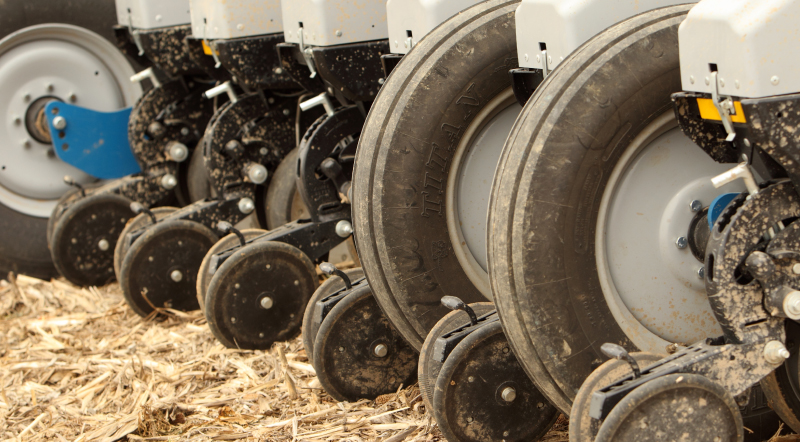
Individual planter components work optimally when the planter is level. To evaluate this, lower the planter into planting position in the field, and have someone drive forward while you observe it moving across the field. The tongue should be level and parallel to the ground. Hitch height can be adjusted accordingly to achieve the desired position. It is also important to check individual tire pressures and ensure that they are uniform across the planter and that tread wear is even. Slight variations can cause emergence issues because of differences in planting depth between units.
This can be assessed by raising the individual row unit with the planter in the raised position. Parallel linkage arms are working properly when units can be lifted uniformly. It is also recommended to twist and move the unit from side to side to verify if the bushings are worn. If there is quite a bit of play, row units can twist, wander, and chatter resulting in poor seed placement. Bolts should be tight on each unit and the bushings should be free of wear.
Worn disc openers can leave a seed furrow that is ’W’ shaped rather than a ‘V’. A ‘W’ shaped furrow often results in the seed falling to one side of the ridge and upon furrow closure poor seed to soil contact can result leading to non-uniform emergence. To check disc openers for wear, use two business cards, sliding one card down from the top between the blades until it stops, and sliding the other card from the bottom until it also stops. Then measure the distance between the two cards. For most standard blades, the correct distance is 2 to 3 inches. If this distance is less, measure blade diameter to determine if it is within manufacturer specification. If these criteria are met, remove shims and adjust the blades inward until they make proper contact. If heavy duty disc openers are installed on your planter, the measurement between the cards should be 1 to 1.5 inches. It is important to verify disc opener specs by manufacturer and part number since this can vary.
Problems with gauge wheels can lead to inconsistent planting depth. Gauge wheels should be in contact with the disc openers, and to check for proper operation, raise the planter and spin the gauge wheel. It should consistently maintain contact with the disc openers. Gauge wheels should also ‘walk’ freely and run parallel to the direction of travel.
It is important to test seed meters regularly to ensure they’re in proper working order. Consult your operator’s manual or your local implement dealer for proper specs. Individual meter components that are showing excessive wear should be replaced. Regarding finger pickup units, it is important to follow torque specs specified by the manufacturer. In some instances, these specs can be in inch-pounds, which is roughly finger tight.
Worn out scrapers can lead to soil build up on the inside of the disc openers in tacky soil conditions. Worn seed tubes can cause the seed to bounce and catch despite the meter working properly, ultimately resulting in poor seed spacing. It is easy to overlook these two items, but prior to planting season you should make sure to inspect them.
This can be accomplished two ways. You can lower the planter on dirt or concrete and drive forward. Verify that the groove created by the disc openers is centered in relation to the closing wheels. This can also be accomplished by grabbing a fiberglass flag and centering it flat under the disc openers and seed tube. Then check whether the closing wheels are also centered over the flag. Proper seed furrow closure is tested by running the planter in the field and digging seeds. The full depth of the seed trench should be closed without void with the soil being somewhat loose.
No-till coulters should be shallower than the disc openers. To check this, place a board under the row unit parallel to travel direction. Lower the planter until the disc openers contact the board. The coulter should be 1/4 to 3/8 of an inch shallower than the disc openers. It is also important to check that the coulters are sharp. Dull coulters can hair-pin residue in the seed furrow rather than cutting it cleanly. The purpose of the coulter is to cut residue and fluff the soil slightly so that the disc openers can function properly without creating side wall compaction.
Residue managers should barely skim the ground when planting and should not continually rotate. If they are moving dirt, they are too deep. This can result in a ditch where excessive water can pool over the furrow. Poor seed to soil contact can arise if they are too high due to residue entering the furrow. No two fields are the same, so it may be necessary to re-adjust your residue managers throughout the planting season.
The proper amount of down-force can vary based on field conditions, and improper pressure can cause uneven emergence. Too much down-force can result in side-wall compaction leading to reduced early season root growth. Too little down-force can cause improper seed to soil contact and non-uniform emergence. The appropriate amount of down-force is achieved when the planter is lowered into planting position and the gauge wheels can be spun with your foot. It is important to check each row unit to ensure uniformity across the planter.
Center-filled planters comprise most of the planters being utilized in the countryside. This means that there is not as much weight residing over the wings, and with auto-steer some growers are forgoing marker arms on their planter. Too little weight can lead to these wing units floating, resulting in shallow seed placement. It is important to consult with your manufacturer to determine how much weight is needed to make up for this deficit. Many manufacturers offer weight kits to ensure a clean and easy installation.
Proper, uniform seed placement within the seed furrow will ensure the crop gets off to a good start. Any detrimental conditions that affect emergence and early season root growth can lead to further ramifications come fall.
If you have any questions on best placing and managing your Burrus Seed, Power Plus or DONMARIOcorn and soybean products this spring, contact your Burrus Representative.